配置docker科技网络
创建或编辑 Docker 配置文件 让docker使用代理:
sudo mkdir /etc/systemd/system/docker.service.d -p
sudo vim /etc/systemd/system/docker.service.d/http-proxy.conf 文件,并添加以下内容:
[Service]
Environment="HTTP_PROXY=http://10.10.9.232:30809"
Environment="HTTPS_PROXY=http://10.10.9.232:30809"
Environment="NO_PROXY=localhost,127.0.0.1"
重新加载 systemd 配置并重启 Docker 服务:
sudo systemctl daemon-reload
sudo systemctl restart docker
验证配置是否生效
sudo systemctl show --property=Environment docker
1.
2.
3.
4.
5.
6.
7.
8.
9.
10.
11.
12.
13.
14.
Ubuntu 22.04 安装 Docker
curl -fsSL https://get.docker.com | bash -s docker --mirror Aliyun
systemctl enable --now docker
1.
2.
验证安装
docker -v
docker-compose -v
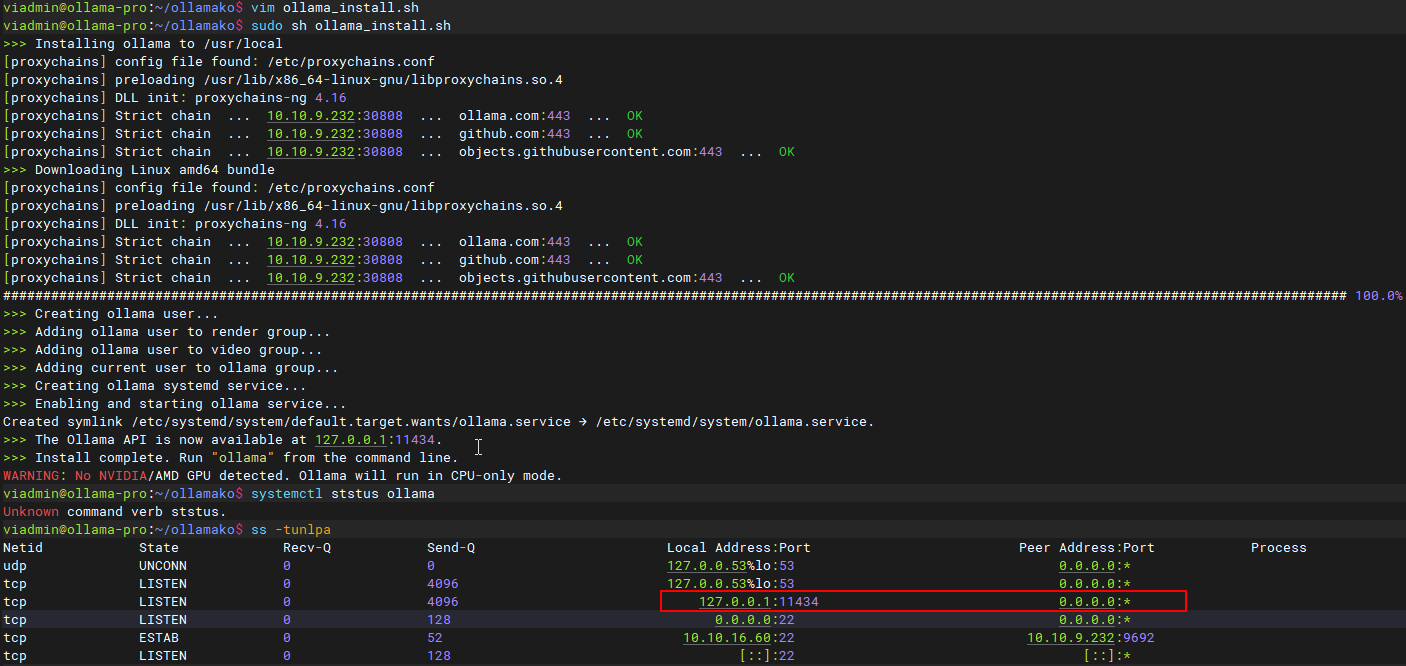
在开始之前必须具备科技网络,然后安装并配置好proxychains
配置好proxychains工具之后,将在线安装脚本的所有curl命令前面增加命令:proxychains
然后正常执行安装脚本,期间保证科技网络能够使用,没有意外的话即可在线安装成功。
在线安装ollama
1.
2.
3.
4.
5.
6.
7.
8.
9.
10.
11.
1.
2.
3.
4.
5.
6.
7.
8.
9.
10.
11.
12.
13.
14.
15.
16.
17.
18.
19.
20.
21.
22.
23.
24.
25.
26.
27.
28.
29.
30.
31.
32.
33.
34.
35.
36.
37.
38.
39.
40.
41.
42.
43.
44.
45.
46.
47.
48.
49.
50.
51.
52.
53.
54.
55.
56.
57.
58.
59.
60.
61.
62.
63.
64.
65.
66.
67.
68.
69.
70.
71.
72.
73.
74.
75.
76.
77.
78.
79.
80.
81.
82.
83.
84.
85.
86.
87.
88.
89.
90.
91.
92.
93.
94.
95.
96.
97.
98.
99.
100.
101.
102.
103.
104.
105.
106.
107.
108.
109.
110.
111.
112.
113.
114.
115.
116.
117.
118.
119.
120.
121.
122.
123.
124.
125.
126.
127.
128.
129.
130.
131.
132.
133.
134.
135.
136.
137.
138.
139.
140.
141.
142.
143.
144.
145.
146.
147.
148.
149.
150.
151.
152.
153.
154.
155.
156.
157.
158.
159.
160.
161.
162.
163.
164.
165.
166.
167.
168.
169.
170.
171.
172.
173.
174.
175.
176.
177.
178.
179.
180.
181.
182.
183.
184.
185.
186.
187.
188.
189.
190.
191.
192.
193.
194.
195.
196.
197.
198.
199.
200.
201.
202.
203.
204.
205.
206.
207.
208.
209.
210.
211.
212.
213.
214.
215.
216.
217.
218.
219.
220.
221.
222.
223.
224.
225.
226.
227.
228.
229.
230.
231.
232.
233.
234.
235.
236.
237.
238.
239.
240.
241.
242.
243.
244.
245.
246.
247.
248.
249.
250.
251.
252.
253.
254.
255.
256.
257.
258.
259.
260.
261.
262.
263.
264.
265.
266.
267.
268.
269.
270.
271.
272.
273.
274.
275.
276.
277.
278.
279.
280.
281.
282.
283.
284.
285.
286.
287.
288.
289.
290.
291.
292.
293.
294.
295.
296.
297.
298.
299.
300.
301.
302.
303.
304.
305.
306.
307.
308.
309.
310.
311.
312.
313.
314.
315.
316.
317.
318.
319.
320.
321.
322.
323.
324.
325.
326.
327.
328.
329.
330.
331.
332.
333.
334.
335.
336.
337.
338.
339.
340.
341.
342.
343.
344.
345.
346.
347.
348.
349.
350.
351.
352.
353.
354.
355.
356.
357.
358.
359.
360.
361.
362.
363.
364.
365.
366.
367.
368.
369.
370.
1.
2.
3.
4.
5.
6.
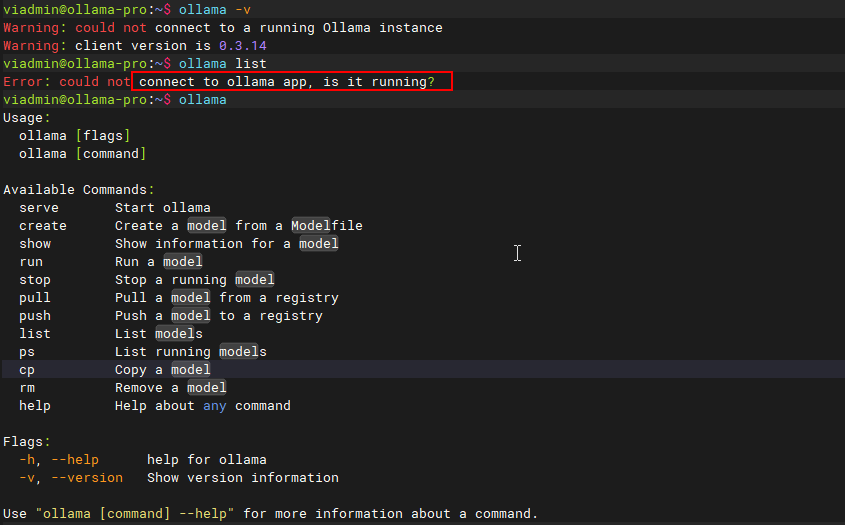
Ollama相关参数
viadmin@ollama-pro:~$ ollama --help
Large language model runner
Usage:
  ollama [flags]
  ollama [command]
Available Commands:
  serve       Start ollama
  create      Create a model from a Modelfile
  show        Show information for a model
  run         Run a model
  stop        Stop a running model
  pull        Pull a model from a registry
  push        Push a model to a registry
  list        List models
  ps          List running models
  cp          Copy a model
  rm          Remove a model
  help        Help about any command
Flags:
  -h, --help      help for ollama
  -v, --version   Show version information
Use "ollama [command] --help" for more information about a command.
1.
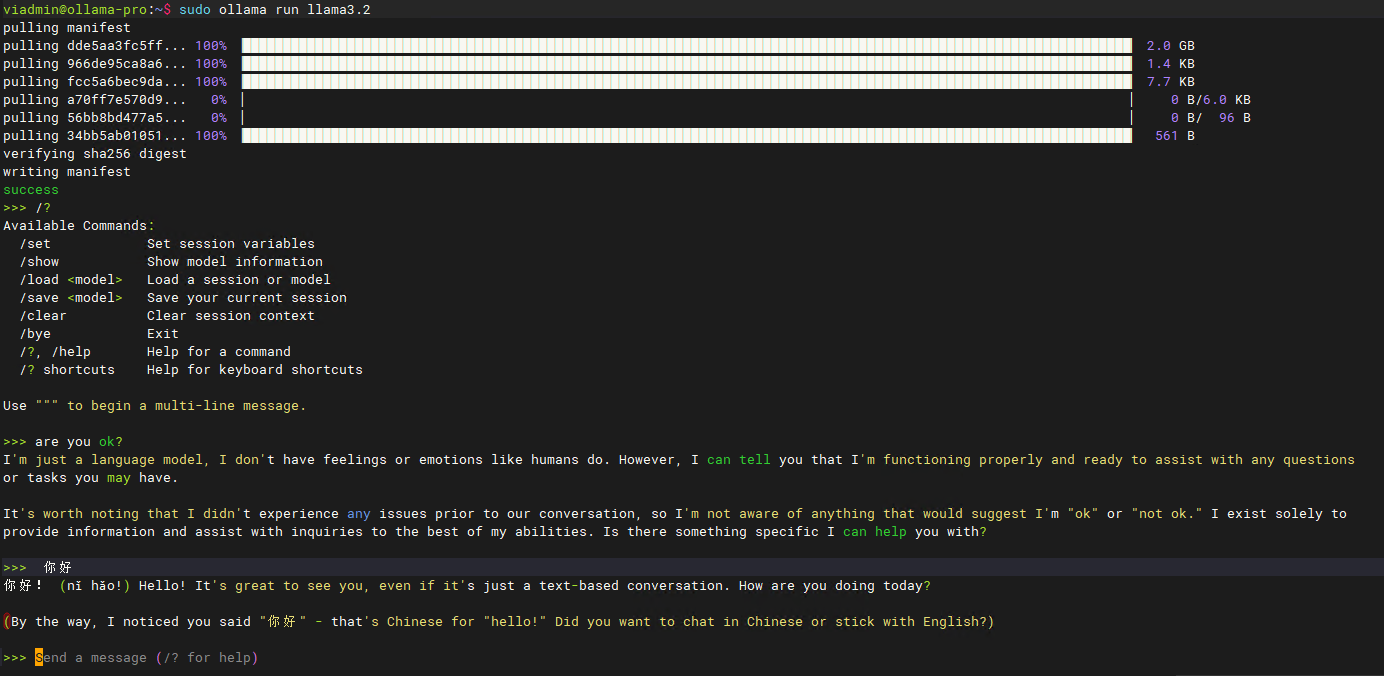
上述启动是一个交互式的形式,可以使用screen命令,进入此空间后再执行。
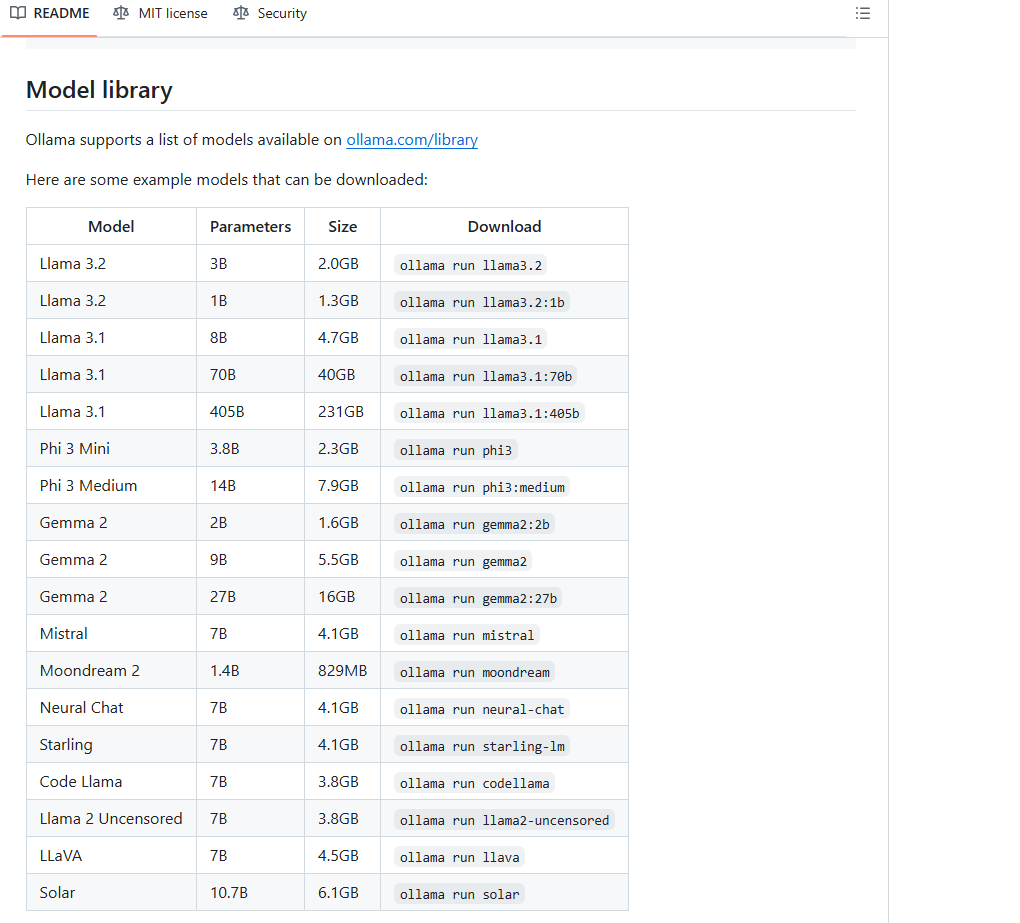
上述执行完成之后就可以下载模型了。
https://github.com/ollama/ollama
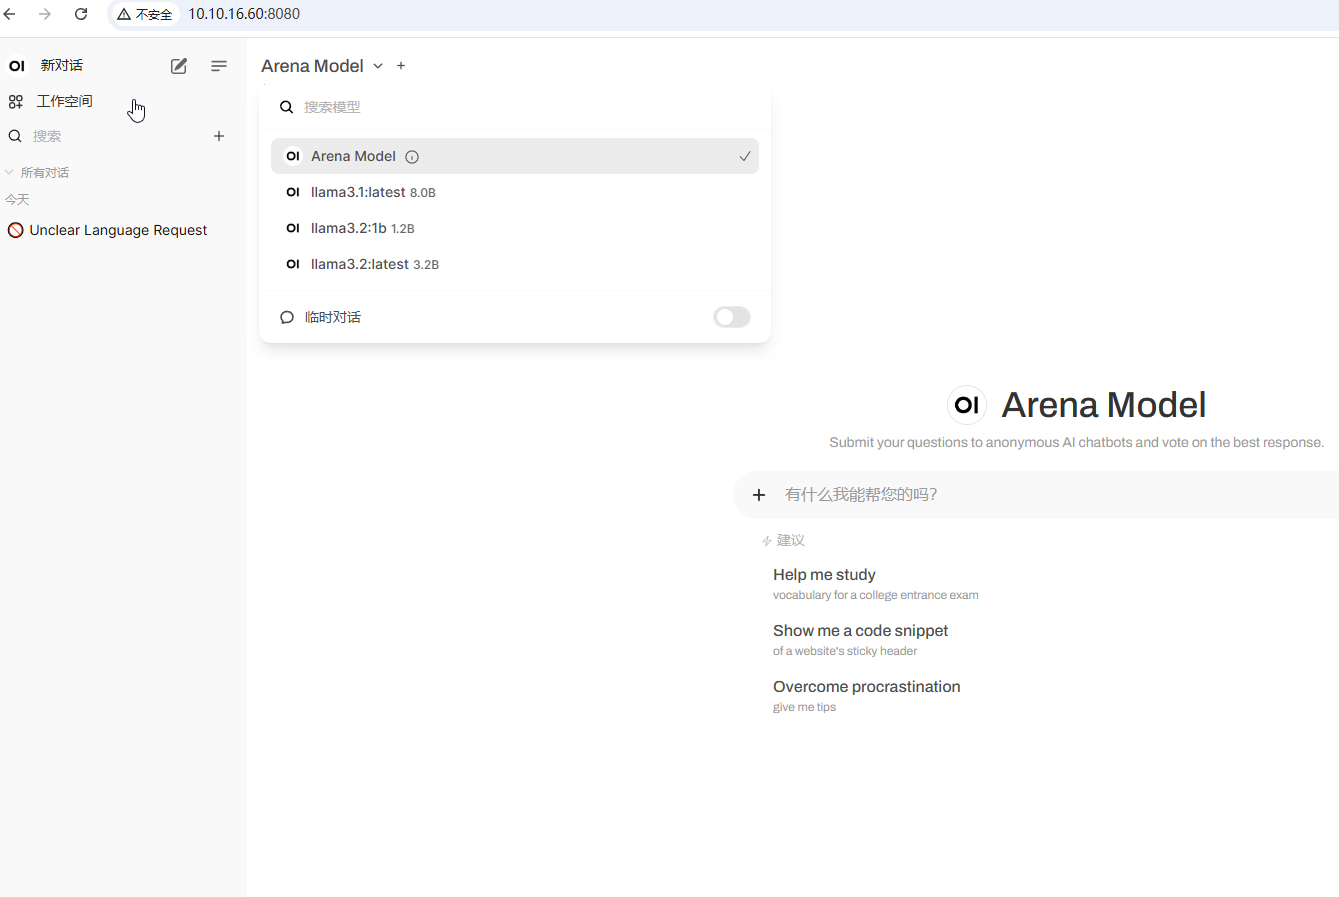
最终效果
使用docker安装Open-Webui
官方文档
https://docs.dify.ai/zh-hans/getting-started/install-self-hosted/docker-compose
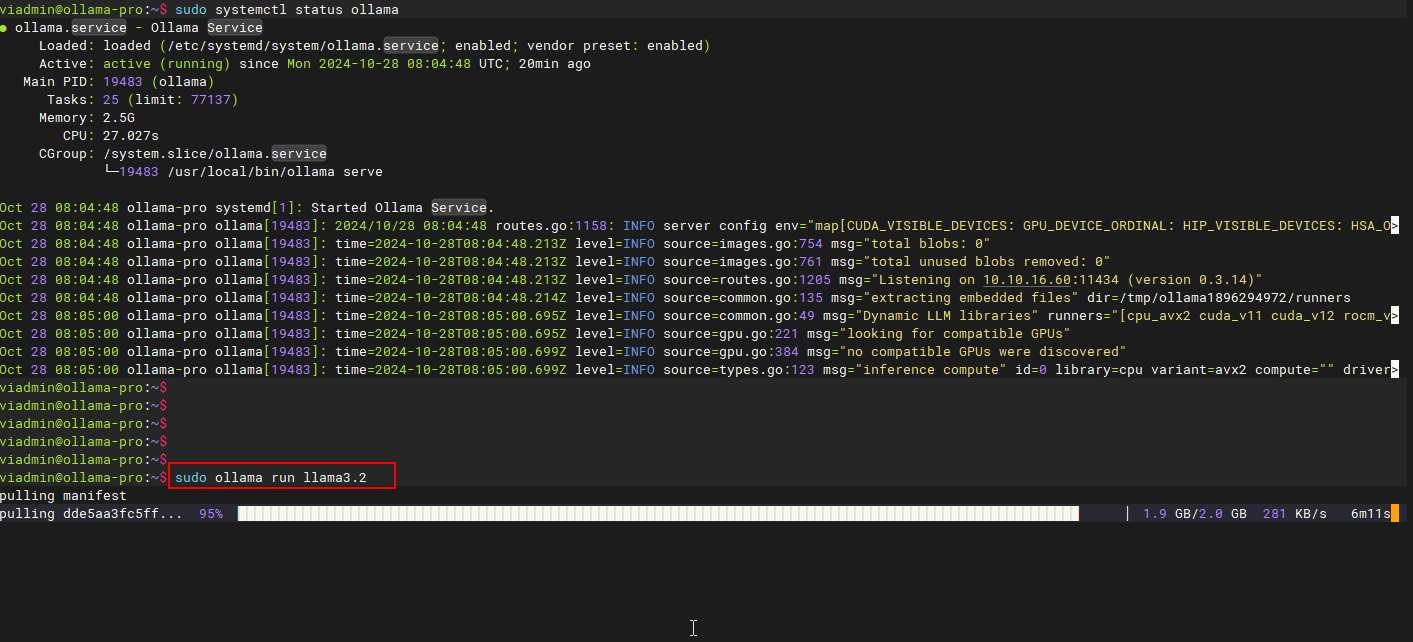
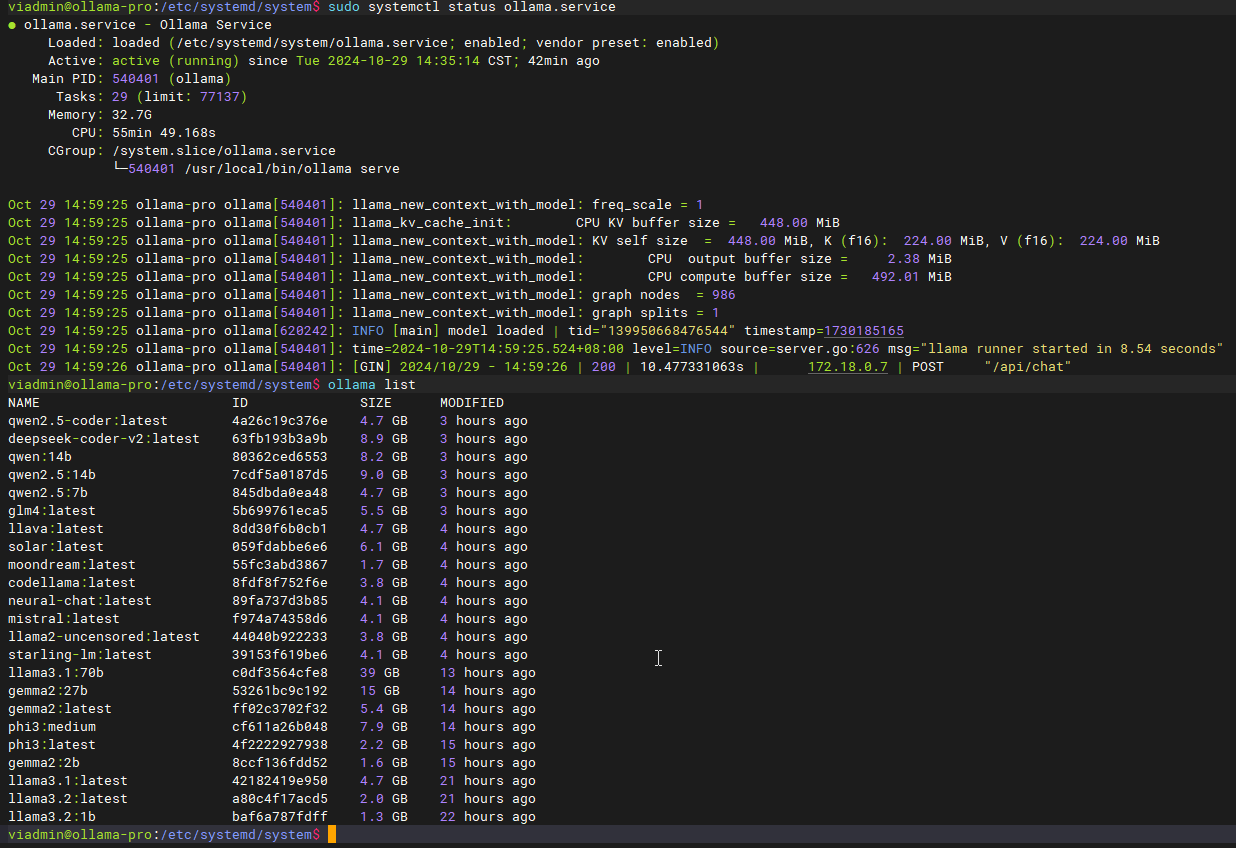
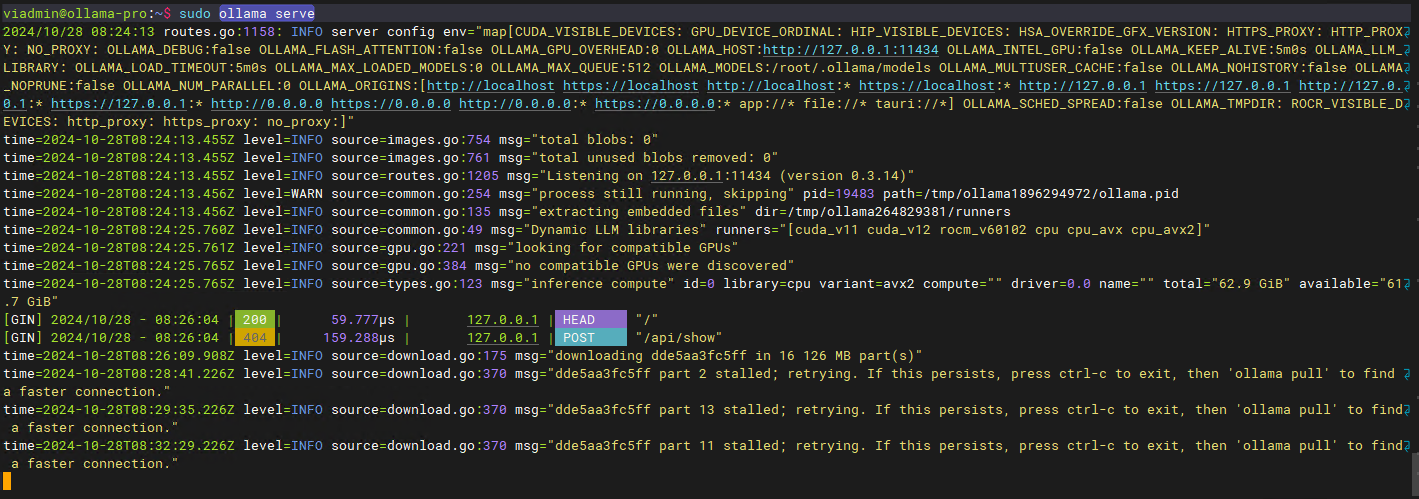
这里刚开始踩了坑,就是默认情况下新版本的Ollama安装成功之后就是以Systemd服务的形式启动,而这个刚开始我没仔细看,导致自己也手动使用ollama serve启动了服务,这样导致互相混淆了,最终导致的结果就是我无论怎么配置加载,在Dify中都无法查看到Ollama所加载的模型。
解决办法就是我关停了自己使用ollama serve启动的服务,然后使用Systemd形式进行管理配置服务,并且配置侦听所有IP地址。
由于上述的操作,导致对应下载的模型路径不对,所以需要更改模型的路径。
需要添加到Systemd的配置参数
1.
2.
1.
2.
3.
4.
5.
6.
7.
8.
9.
10.
11.
12.
13.
14.
15.
16.
17.
1.
2.
3.
迷茫的人生,需要不断努力,才能看清远方模糊的志向!
目录权限记得给够,不行就给777
重启服务
sudo systemctl daemon-reload
sudo systemctl restart ollama.service
sudo systemctl status ollama.service
最终的配置结果
viadmin@ollama-pro:/etc/systemd/system$ cat ollama.service
[Unit]
Description=Ollama Service
After=network-online.target
[Service]
Environment="OLLAMA_HOST=0.0.0.0"
ExecStart=/usr/local/bin/ollama serve
User=ollama
Group=ollama
Restart=always
RestartSec=3
Environment="PATH=/usr/local/sbin:/usr/local/bin:/usr/sbin:/usr/bin:/sbin:/bin:/snap/bin"
Environment="OLLAMA_MODELS=/home/viadmin/.ollama/models"
[Install]
WantedBy=default.target
sudo vim /etc/systemd/system/ollama.service
Environment="OLLAMA_HOST=0.0.0.0"
Environment="OLLAMA_MODELS=/home/viadmin/.ollama/models"
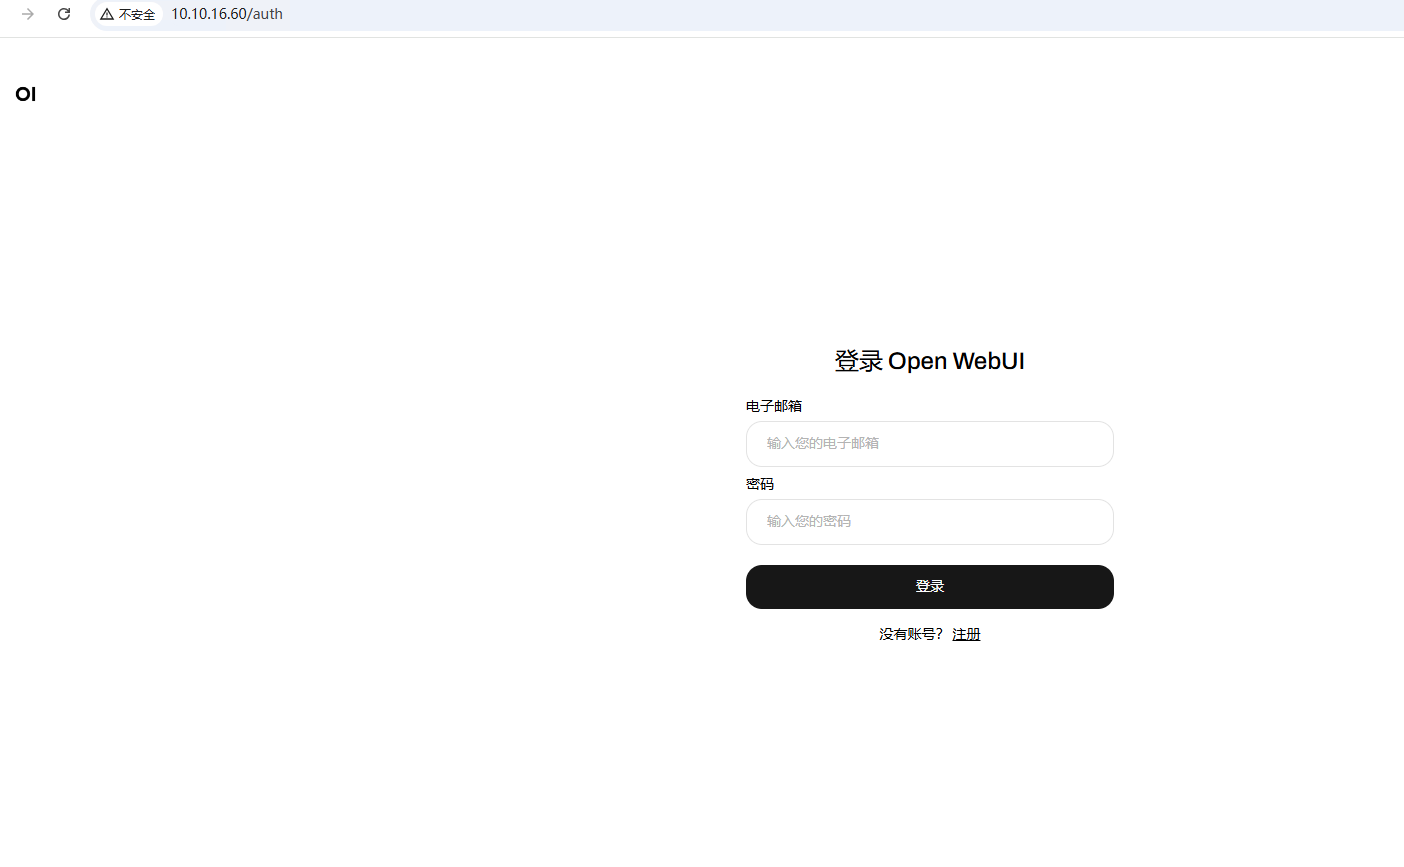
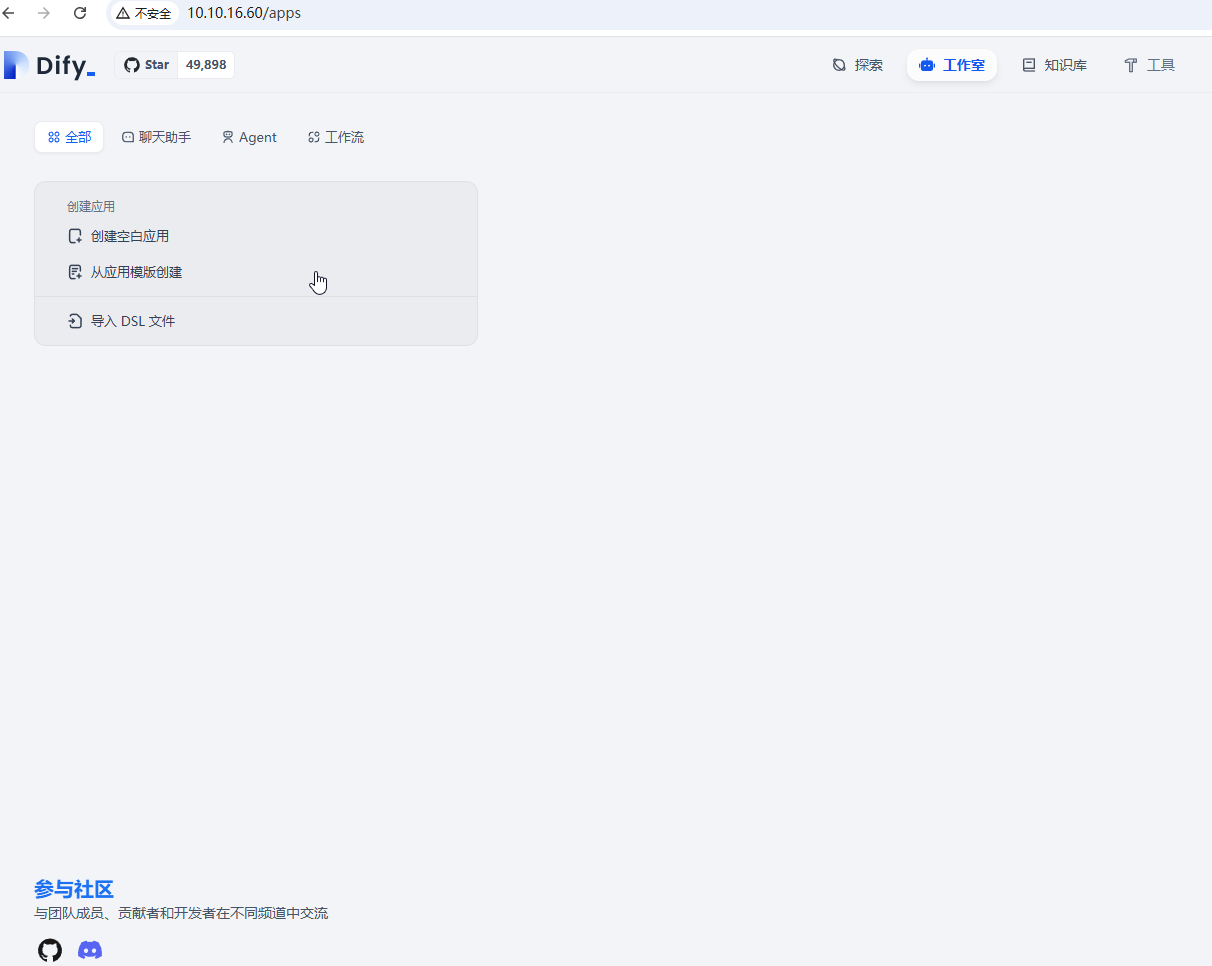
上述完成之后,正常访问部署到服务器的IP地址,然后会让你初始化设置账户和密码,然后登录进去下面是登录进去的效果。
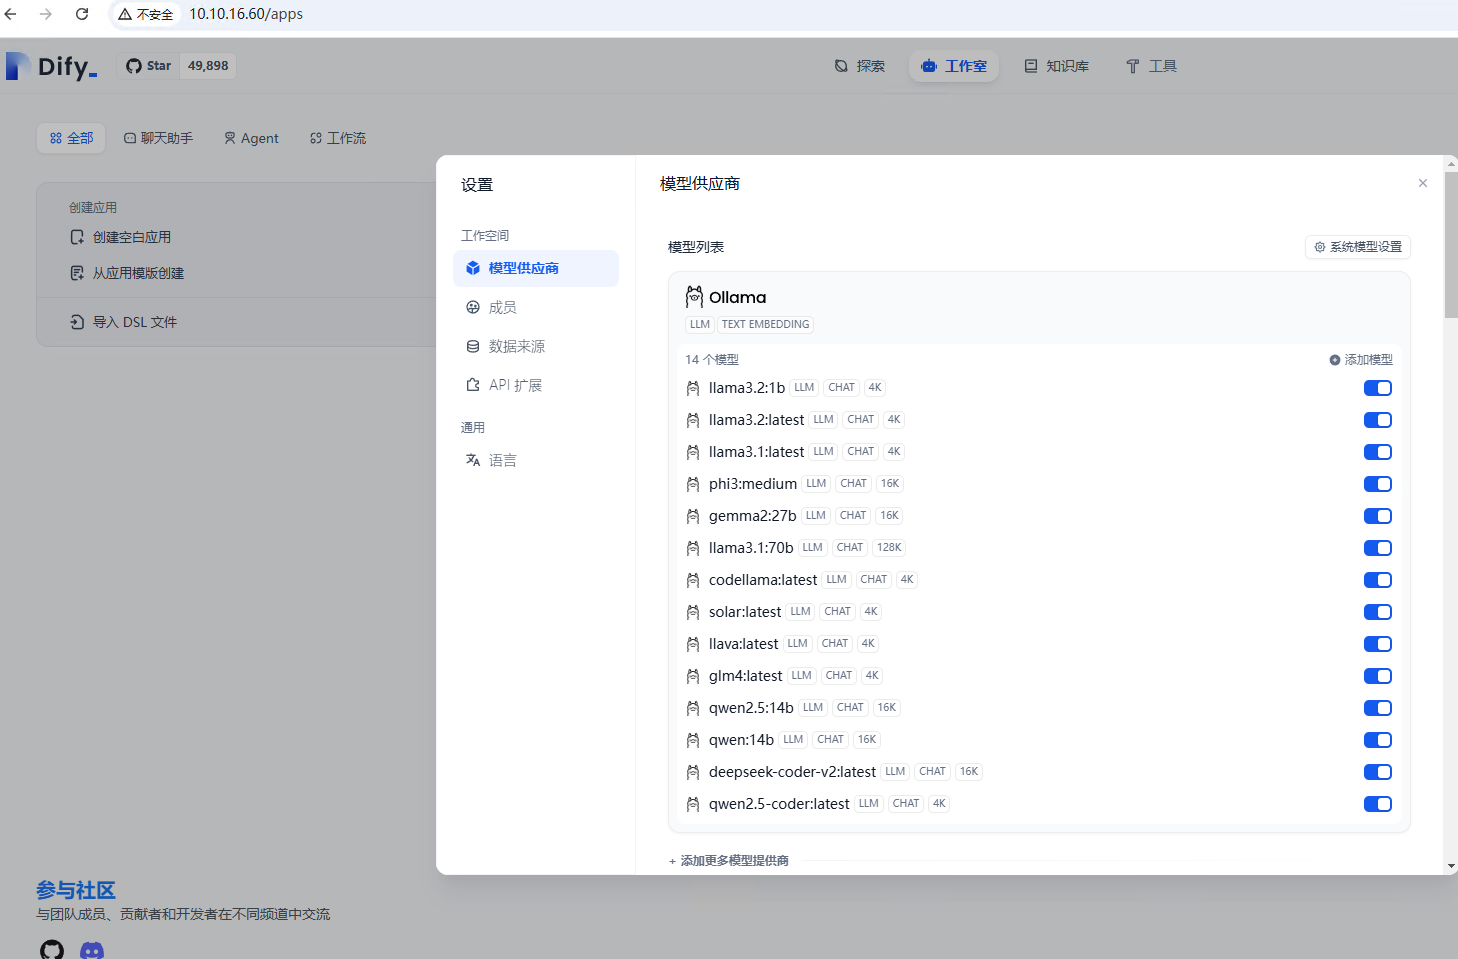
在Dify中加载Ollama
根据你系统上的 Docker Compose 版本,选择合适的命令来启动容器。你可以通过 $ docker compose version 命令检查版本,详细说明请参考 Docker 官方文档:
如果版本是 Docker Compose V2,使用以下命令:docker compose up -d
如果版本是 Docker Compose V1,使用以下命令:docker-compose up -d
最后检查是否所有容器都正常运行:docker compose ps
参考:
经过测试上述操作,虽然open-webui成功启动,但是无法识别本地安装的ollama模型,所以需要使用以下方式启动
sudo docker run -d --network=host -e OLLAMA_BASE_URL=http://127.0.0.1:11434 -v open-webui:/app/backend/data --name open-webui --restart always ghcr.io/open-webui/open-webui:main
https://docs.openwebui.com/
https://github.com/open-webui/open-webui
官方:
sudo docker run -d -p 3000:8080 --add-host=host.docker.internal:host-gateway -v open-webui:/app/backend/data --name open-webui --restart always ghcr.io/open-webui/open-webui:main
自定义安装将3000端口改为80端口
docker run -d -p 80:8080 --add-host=host.docker.internal:host-gateway -v open-webui:/app/backend/data --name open-webui --restart always ghcr.io/open-webui/open-webui:main
经过查询,发现是需要先启动ollama app,启动方式是:sudo ollama serve
1.
2.
3.
4.
5.
6.
7.
8.
9.
10.
11.
12.
13.
14.
15.
16.
17.
18.
19.
20.
21.
22.
23.
24.
25.
26.
安装模型报错问题
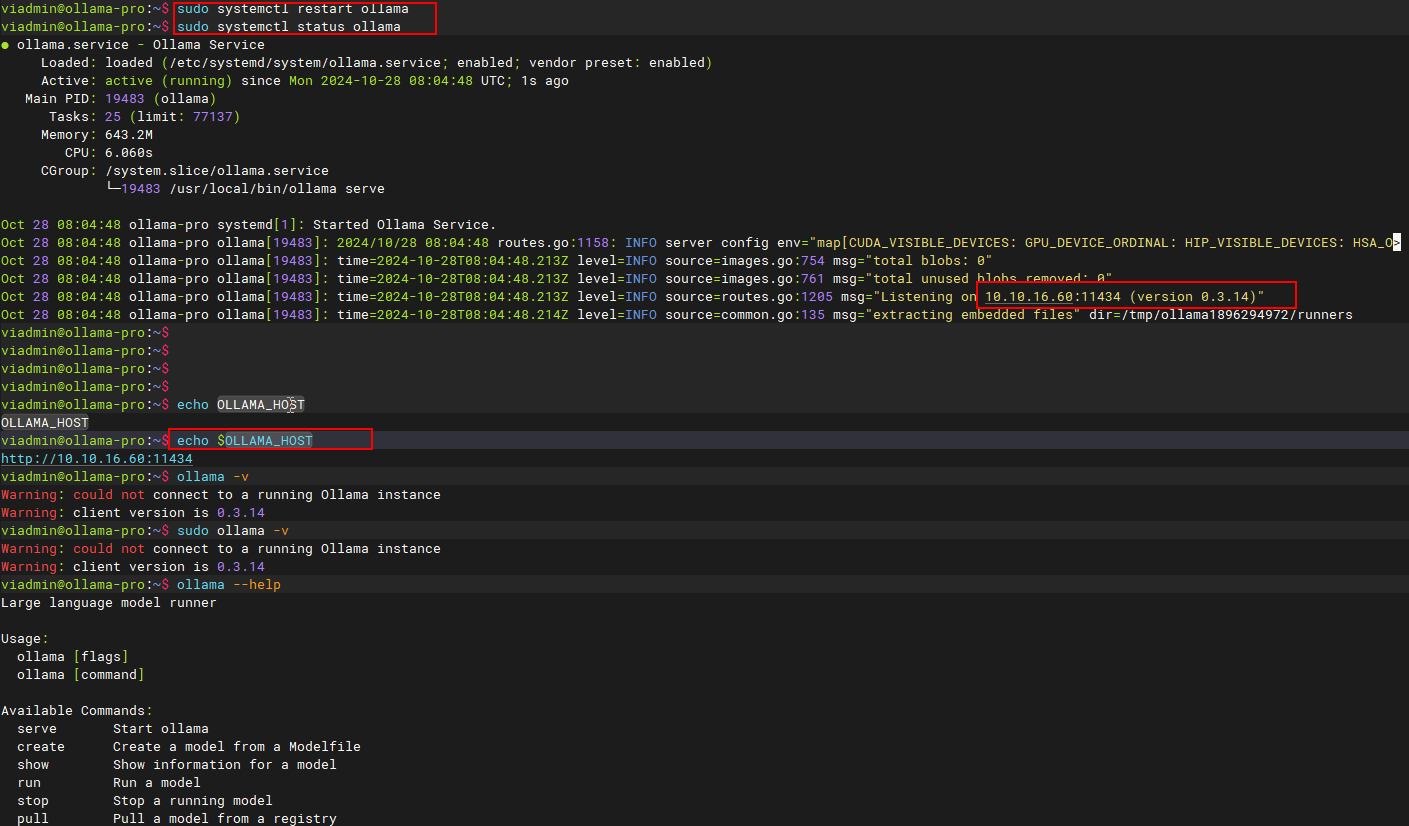
Error: could not connect to ollama app, is it running?
手动安装参考:
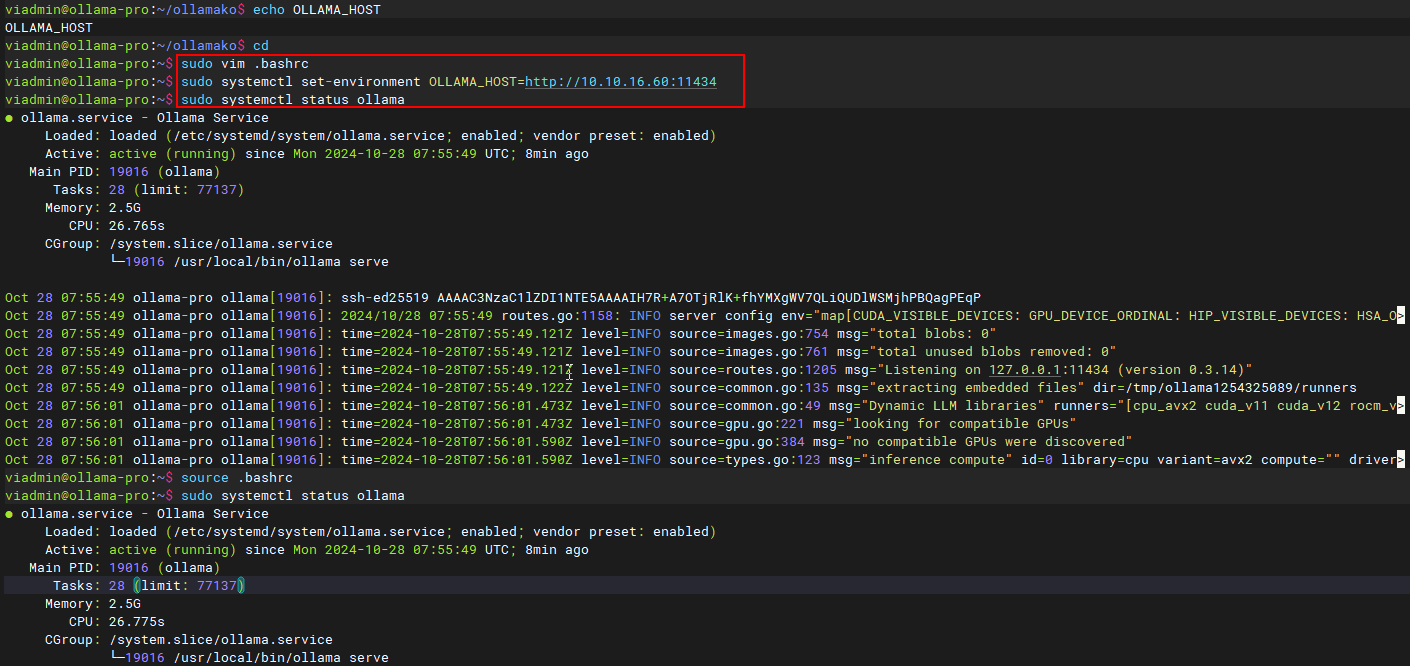
配置环境变量
vim /home/viadmin/.bashrc
export OLLAMA_HOST=http://10.10.16.60:11434
systemctl set-environment OLLAMA_HOST=http://10.10.16.60:11434
source .bashrc
systemctl restart ollama
systemctl status ollama
修改版本原始安装脚本
#!/bin/sh
# This script installs Ollama on Linux.
# It detects the current operating system architecture and installs the appropriate version of Ollama.
set -eu
status() { echo ">>> $*" >&2; }
error() { echo "ERROR $*"; exit 1; }
warning() { echo "WARNING: $*"; }
TEMP_DIR=$(mktemp -d)
cleanup() { rm -rf $TEMP_DIR; }
trap cleanup EXIT
available() { command -v $1 >/dev/null; }
require() {
    local MISSING=''
    for TOOL in $*; do
        if ! available $TOOL; then
            MISSING="$MISSING $TOOL"
        fi
    done
    echo $MISSING
}
[ "$(uname -s)" = "Linux" ] || error 'This script is intended to run on Linux only.'
ARCH=$(uname -m)
case "$ARCH" in
    x86_64) ARCH="amd64" ;;
    aarch64|arm64) ARCH="arm64" ;;
    *) error "Unsupported architecture: $ARCH" ;;
esac
IS_WSL2=false
KERN=$(uname -r)
case "$KERN" in
    *icrosoft*WSL2 | *icrosoft*wsl2) IS_WSL2=true;;
    *icrosoft) error "Microsoft WSL1 is not currently supported. Please use WSL2 with 'wsl --set-version2'" ;;
    *) ;;
esac
VER_PARAM="${OLLAMA_VERSION:+?version=$OLLAMA_VERSION}"
SUDO=
if [ "$(id -u)" -ne 0 ]; then
    # Running as root, no need for sudo
    if ! available sudo; then
        error "This script requires superuser permissions. Please re-run as root."
    fi
    SUDO="sudo"
fi
NEEDS=$(require curl awk grep sed tee xargs)
if [ -n "$NEEDS" ]; then
    status "ERROR: The following tools are required but missing:"
    for NEED in $NEEDS; do
        echo "  - $NEED"
    done
    exit 1
fi
for BINDIR in /usr/local/bin /usr/bin /bin; do
    echo $PATH | grep -q $BINDIR && break || continue
done
OLLAMA_INSTALL_DIR=$(dirname ${BINDIR})
status "Installing ollama to $OLLAMA_INSTALL_DIR"
$SUDO install -o0 -g0 -m755 -d $BINDIR
$SUDO install -o0 -g0 -m755 -d "$OLLAMA_INSTALL_DIR"
if proxychains curl -I --silent --fail --location "https://ollama.com/download/ollama-linux-${ARCH}.tgz${VER_PARAM}" >/dev/null ; then
    status "Downloading Linux ${ARCH} bundle"
    proxychains curl --fail --show-error --location --progress-bar \
        "https://ollama.com/download/ollama-linux-${ARCH}.tgz${VER_PARAM}" | \
        $SUDO tar -xzf - -C "$OLLAMA_INSTALL_DIR"
    BUNDLE=1
    if [ "$OLLAMA_INSTALL_DIR/bin/ollama" != "$BINDIR/ollama" ] ; then
        status "Making ollama accessible in the PATH in $BINDIR"
        $SUDO ln -sf "$OLLAMA_INSTALL_DIR/ollama" "$BINDIR/ollama"
    fi
else
    status "Downloading Linux ${ARCH} CLI"
    proxychains curl --fail --show-error --location --progress-bar -o "$TEMP_DIR/ollama"\
    "https://ollama.com/download/ollama-linux-${ARCH}${VER_PARAM}"
    $SUDO install -o0 -g0 -m755 $TEMP_DIR/ollama $OLLAMA_INSTALL_DIR/ollama
    BUNDLE=0
    if [ "$OLLAMA_INSTALL_DIR/ollama" != "$BINDIR/ollama" ] ; then
        status "Making ollama accessible in the PATH in $BINDIR"
        $SUDO ln -sf "$OLLAMA_INSTALL_DIR/ollama" "$BINDIR/ollama"
    fi
fi
install_success() {
    status 'The Ollama API is now available at 127.0.0.1:11434.'
    status 'Install complete. Run "ollama" from the command line.'
}
trap install_success EXIT
# Everything from this point onwards is optional.
configure_systemd() {
    if ! id ollama >/dev/null 2>&1; then
        status "Creating ollama user..."
        $SUDO useradd -r -s /bin/false -U -m -d /usr/share/ollama ollama
    fi
    if getent group render >/dev/null 2>&1; then
        status "Adding ollama user to render group..."
        $SUDO usermod -a -G render ollama
    fi
    if getent group video >/dev/null 2>&1; then
        status "Adding ollama user to video group..."
        $SUDO usermod -a -G video ollama
    fi
    status "Adding current user to ollama group..."
    $SUDO usermod -a -G ollama $(whoami)
    status "Creating ollama systemd service..."
    cat /dev/null
[Unit]
Description=Ollama Service
After=network-online.target
[Service]
ExecStart=$BINDIR/ollama serve
User=ollama
Group=ollama
Restart=always
RestartSec=3
Environment="PATH=$PATH"
[Install]
WantedBy=default.target
EOF
    SYSTEMCTL_RUNNING="$(systemctl is-system-running || true)"
    case $SYSTEMCTL_RUNNING in
        running|degraded)
            status "Enabling and starting ollama service..."
            $SUDO systemctl daemon-reload
            $SUDO systemctl enable ollama
            start_service() { $SUDO systemctl restart ollama; }
            trap start_service EXIT
            ;;
    esac
}
if available systemctl; then
    configure_systemd
fi
# WSL2 only supports GPUs via nvidia passthrough
# so check for nvidia-smi to determine if GPU is available
if [ "$IS_WSL2" = true ]; then
    if available nvidia-smi && [ -n "$(nvidia-smi | grep -o "CUDA Version: [0-9]*\.[0-9]*")" ]; then
        status "Nvidia GPU detected."
    fi
    install_success
    exit 0
fi
# Install GPU dependencies on Linux
if ! available lspci && ! available lshw; then
    warning "Unable to detect NVIDIA/AMD GPU. Install lspci or lshw to automatically detect and install GPU dependencies."
    exit 0
fi
check_gpu() {
    # Look for devices based on vendor ID for NVIDIA and AMD
    case $1 in
        lspci)
            case $2 in
                nvidia) available lspci && lspci -d '10de:' | grep -q 'NVIDIA' || return 1 ;;
                amdgpu) available lspci && lspci -d '1002:' | grep -q 'AMD' || return 1 ;;
            esac ;;
        lshw)
            case $2 in
                nvidia) available lshw && $SUDO lshw -c display -numeric -disable network | grep -q 'vendor: .* \[10DE\]' || return 1 ;;
                amdgpu) available lshw && $SUDO lshw -c display -numeric -disable network | grep -q 'vendor: .* \[1002\]' || return 1 ;;
            esac ;;
        nvidia-smi) available nvidia-smi || return 1 ;;
    esac
}
if check_gpu nvidia-smi; then
    status "NVIDIA GPU installed."
    exit 0
fi
if ! check_gpu lspci nvidia && ! check_gpu lshw nvidia && ! check_gpu lspci amdgpu && ! check_gpu lshw amdgpu; then
    install_success
    warning "No NVIDIA/AMD GPU detected. Ollama will run in CPU-only mode."
    exit 0
fi
if check_gpu lspci amdgpu || check_gpu lshw amdgpu; then
    if [ $BUNDLE -ne 0 ]; then
        status "Downloading Linux ROCm ${ARCH} bundle"
        proxychains curl --fail --show-error --location --progress-bar \
            "https://ollama.com/download/ollama-linux-${ARCH}-rocm.tgz${VER_PARAM}" | \
            $SUDO tar -xzf - -C "$OLLAMA_INSTALL_DIR"
        install_success
        status "AMD GPU ready."
        exit 0
    fi
    # Look for pre-existing ROCm v6 before downloading the dependencies
    for search in "${HIP_PATH:-''}" "${ROCM_PATH:-''}" "/opt/rocm" "/usr/lib64"; do
        if [ -n "${search}" ] && [ -e "${search}/libhipblas.so.2" -o -e "${search}/lib/libhipblas.so.2" ]; then
            status "Compatible AMD GPU ROCm library detected at ${search}"
            install_success
            exit 0
        fi
    done
    status "Downloading AMD GPU dependencies..."
    $SUDO rm -rf /usr/share/ollama/lib
    $SUDO chmod o+x /usr/share/ollama
    $SUDO install -o ollama -g ollama -m 755 -d /usr/share/ollama/lib/rocm
    proxychains curl --fail --show-error --location --progress-bar "https://ollama.com/download/ollama-linux-amd64-rocm.tgz${VER_PARAM}" \
        | $SUDO tar zx --owner ollama --group ollama -C /usr/share/ollama/lib/rocm .
    install_success
    status "AMD GPU ready."
    exit 0
fi
CUDA_REPO_ERR_MSG="NVIDIA GPU detected, but your OS and Architecture are not supported by NVIDIA.  Please install the CUDA driver manually https://docs.nvidia.com/cuda/cuda-installation-guide-linux/"
# ref: https://docs.nvidia.com/cuda/cuda-installation-guide-linux/index.html#rhel-7-centos-7
# ref: https://docs.nvidia.com/cuda/cuda-installation-guide-linux/index.html#rhel-8-rocky-8
# ref: https://docs.nvidia.com/cuda/cuda-installation-guide-linux/index.html#rhel-9-rocky-9
# ref: https://docs.nvidia.com/cuda/cuda-installation-guide-linux/index.html#fedora
install_cuda_driver_yum() {
    status 'Installing NVIDIA repository...'

    case $PACKAGE_MANAGER in
        yum)
            $SUDO $PACKAGE_MANAGER -y install yum-utils
            if proxychains curl -I --silent --fail --location "https://developer.download.nvidia.com/compute/cuda/repos/$1$2/$(uname -m | sed -e 's/aarch64/sbsa/')/cuda-$1$2.repo" >/dev/null ; then
                $SUDO $PACKAGE_MANAGER-config-manager --add-repo https://developer.download.nvidia.com/compute/cuda/repos/$1$2/$(uname -m | sed -e 's/aarch64/sbsa/')/cuda-$1$2.repo
            else
                error $CUDA_REPO_ERR_MSG
            fi
            ;;
        dnf)
            if proxychains curl -I --silent --fail --location "https://developer.download.nvidia.com/compute/cuda/repos/$1$2/$(uname -m | sed -e 's/aarch64/sbsa/')/cuda-$1$2.repo" >/dev/null ; then
                $SUDO $PACKAGE_MANAGER config-manager --add-repo https://developer.download.nvidia.com/compute/cuda/repos/$1$2/$(uname -m | sed -e 's/aarch64/sbsa/')/cuda-$1$2.repo
            else
                error $CUDA_REPO_ERR_MSG
            fi
            ;;
    esac
    case $1 in
        rhel)
            status 'Installing EPEL repository...'
            # EPEL is required for third-party dependencies such as dkms and libvdpau
            $SUDO $PACKAGE_MANAGER -y install https://dl.fedoraproject.org/pub/epel/epel-release-latest-$2.noarch.rpm || true
            ;;
    esac
    status 'Installing CUDA driver...'
    if [ "$1" = 'centos' ] || [ "$1$2" = 'rhel7' ]; then
        $SUDO $PACKAGE_MANAGER -y install nvidia-driver-latest-dkms
    fi
    $SUDO $PACKAGE_MANAGER -y install cuda-drivers
}
# ref: https://docs.nvidia.com/cuda/cuda-installation-guide-linux/index.html#ubuntu
# ref: https://docs.nvidia.com/cuda/cuda-installation-guide-linux/index.html#debian
install_cuda_driver_apt() {
    status 'Installing NVIDIA repository...'
    if proxychains curl -I --silent --fail --location "https://developer.download.nvidia.com/compute/cuda/repos/$1$2/$(uname -m | sed -e 's/aarch64/sbsa/')/cuda-keyring_1.1-1_all.deb" >/dev/null ; then
        proxychains curl -fsSL -o $TEMP_DIR/cuda-keyring.deb https://developer.download.nvidia.com/compute/cuda/repos/$1$2/$(uname -m | sed -e 's/aarch64/sbsa/')/cuda-keyring_1.1-1_all.deb
    else
        error $CUDA_REPO_ERR_MSG
    fi
    case $1 in
        debian)
            status 'Enabling contrib sources...'
            $SUDO sed 's/main/contrib/' < /etc/apt/sources.list | $SUDO tee /etc/apt/sources.list.d/contrib.list > /dev/null
            if [ -f "/etc/apt/sources.list.d/debian.sources" ]; then
                $SUDO sed 's/main/contrib/' < /etc/apt/sources.list.d/debian.sources | $SUDO tee /etc/apt/sources.list.d/contrib.sources > /dev/null
            fi
            ;;
    esac
    status 'Installing CUDA driver...'
    $SUDO dpkg -i $TEMP_DIR/cuda-keyring.deb
    $SUDO apt-get update
    [ -n "$SUDO" ] && SUDO_E="$SUDO -E" || SUDO_E=
    DEBIAN_FRONTEND=noninteractive $SUDO_E apt-get -y install cuda-drivers -q
}
if [ ! -f "/etc/os-release" ]; then
    error "Unknown distribution. Skipping CUDA installation."
fi
. /etc/os-release
OS_NAME=$ID
OS_VERSION=$VERSION_ID
PACKAGE_MANAGER=
for PACKAGE_MANAGER in dnf yum apt-get; do
    if available $PACKAGE_MANAGER; then
        break
    fi
done
if [ -z "$PACKAGE_MANAGER" ]; then
    error "Unknown package manager. Skipping CUDA installation."
fi
if ! check_gpu nvidia-smi || [ -z "$(nvidia-smi | grep -o "CUDA Version: [0-9]*\.[0-9]*")" ]; then
    case $OS_NAME in
        centos|rhel) install_cuda_driver_yum 'rhel' $(echo $OS_VERSION | cut -d '.' -f 1) ;;
        rocky) install_cuda_driver_yum 'rhel' $(echo $OS_VERSION | cut -c1) ;;
        fedora) [ $OS_VERSION -lt '39' ] && install_cuda_driver_yum $OS_NAME $OS_VERSION || install_cuda_driver_yum $OS_NAME '39';;
        amzn) install_cuda_driver_yum 'fedora' '37' ;;
        debian) install_cuda_driver_apt $OS_NAME $OS_VERSION ;;
        ubuntu) install_cuda_driver_apt $OS_NAME $(echo $OS_VERSION | sed 's/\.//') ;;
        *) exit ;;
    esac
fi
if ! lsmod | grep -q nvidia || ! lsmod | grep -q nvidia_uvm; then
    KERNEL_RELEASE="$(uname -r)"
    case $OS_NAME in
        rocky) $SUDO $PACKAGE_MANAGER -y install kernel-devel kernel-headers ;;
        centos|rhel|amzn) $SUDO $PACKAGE_MANAGER -y install kernel-devel-$KERNEL_RELEASE kernel-headers-$KERNEL_RELEASE ;;
        fedora) $SUDO $PACKAGE_MANAGER -y install kernel-devel-$KERNEL_RELEASE ;;
        debian|ubuntu) $SUDO apt-get -y install linux-headers-$KERNEL_RELEASE ;;
        *) exit ;;
    esac
    NVIDIA_CUDA_VERSION=$($SUDO dkms status | awk -F: '/added/ { print $1 }')
    if [ -n "$NVIDIA_CUDA_VERSION" ]; then
        $SUDO dkms install $NVIDIA_CUDA_VERSION
    fi
    if lsmod | grep -q nouveau; then
        status 'Reboot to complete NVIDIA CUDA driver install.'
        exit 0
    fi
    $SUDO modprobe nvidia
    $SUDO modprobe nvidia_uvm
fi
# make sure the NVIDIA modules are loaded on boot with nvidia-persistenced
if available nvidia-persistenced; then
    $SUDO touch /etc/modules-load.d/nvidia.conf
    MODULES="nvidia nvidia-uvm"
    for MODULE in $MODULES; do
        if ! grep -qxF "$MODULE" /etc/modules-load.d/nvidia.conf; then
            echo "$MODULE" | $SUDO tee -a /etc/modules-load.d/nvidia.conf > /dev/null
        fi
    done
fi
status "NVIDIA GPU ready."
install_success
https://ollama.com/download/linux
https://ollama.com/library/llama3.1:8b
国内,安装因为速度太慢而超时安装不了,所以,将安装脚本下载下来,走代理安装
wget https://ollama.com/install.sh
chmod +x install.sh
或者
curl -fsSL https://ollama.com/install.sh -o ollama_install.sh
chmod +x ollama_install.sh
或者
curl -O https://ollama.com/install.sh
chmod +x install.sh
1.
2.
Ubuntu 22.04 安装ollama
1.
2.
安装 docker-compose
curl -L https://github.com/docker/compose/releases/download/v2.20.3/docker-compose-`uname -s`-`uname -m` -o /usr/local/bin/docker-compose
chmod +x /usr/local/bin/docker-compose
克隆 Dify 源代码至本地环境。git clone https://github.com/langgenius/dify.git
进入 Dify 源代码的 Docker 目录cd dify/docker
复制环境配置文件cp .env.example .env
启动 Docker 容器


